External wall insulation
External wall insulation in Middlesbrough
External wall insulation (EWI) is a layer of insulation boards fixed to the outside of the wall, covered with a reinforced basecoat and a render or other finish. From the street it looks like a rendered house, but the wall face moves outwards by the thickness of the system, so windows, sills, pipes and the roof edge all have to be reworked around it.

On this page
What the system is made of
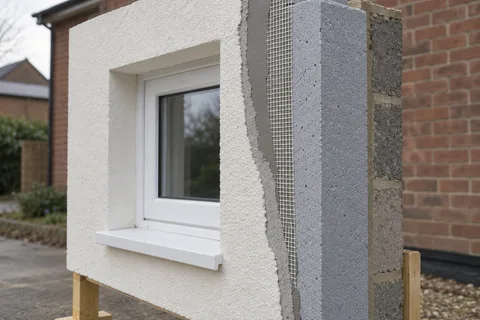
The Insulated Render and Cladding Association (INCA) sets out the general build-up. A starter track is fixed along the bottom, above the DPC, to carry the first row of boards and protect their lower edge. Boards are stuck to the wall with adhesive round their edges plus dabs in the middle, laid in a staggered bond and interlocked at corners, with no gaps wider than 2mm. Mechanical fixings are then drilled through each board into the wall, typically about five per board. Corner, base and movement beads go on, and a reinforcing basecoat around 6mm thick is applied with glass-fibre mesh embedded just below its surface. After that comes a primer and the finish: a thin silicone render, a dash, a thicker render or brick slips.
Every manufacturer has its own components and installation guide, and INCA says that guide must be followed. Board type, thickness and fixing pattern are design decisions for the actual wall, not standard figures.
- Existing wall Prepared; fittings removed and the base track fixed above ground level.
- Insulation boards Bonded with adhesive and, in most systems, mechanically fixed to the wall.
- Basecoat with mesh Reinforcement mesh embedded across the board joints and around openings.
- Primer Where the system requires it.
- Finish render A thin-coat finish that weatherproofs the insulation.
Wall on the left, finish on the right. Not to scale: coats, thicknesses and primers follow the chosen manufacturer’s system and the condition of the wall.
When it makes sense
EWI is an option for solid walls where there is no cavity to fill. If the render also needs replacing, the project can share access, removal and refitting work, but that does not establish whether a particular insulation system suits the house. Approved Document L for dwellings requires an upgrade assessment when renovation exceeds half of a thermal element or more than a quarter of the external building envelope. For render stripped externally, measure the elevation identified by the guidance. Ask the designer to resolve the feasible improvement and window, roof and ground-level junctions before the contractor prices boards and finishes.
It is harder to justify where the wall has an unresolved damp problem, where the extra thickness would block a narrow passage or overhang a neighbour's land, or where the house sits in a conservation area. Government guidance says cladding any part of a house there is not permitted development, so planning permission is needed. Middlesbrough Council's Linthorpe Article 4 direction adds further controls at listed addresses.
What happens to the house
The order follows INCA's outline, with the preparation and fittings work that comes first on an existing house.
Survey the walls, note repairs and check how fittings and pipes will be re-routed.
Remove downpipes, lights, cables and brackets; repair and clean the wall so the adhesive can bond.
Fix the starter track above the DPC, level along the wall.
Bond the boards with adhesive in a staggered pattern, then drill and fix them mechanically.
Rasp the board surface flat and fix corner, base and movement beads in basecoat.
Apply the basecoat, embed the mesh with overlaps and extra patches at opening corners, and let it dry.
Prime and apply the finish coat, then refit pipes and fittings on brackets designed for insulated walls.
The details that need designing
Window reveals are the awkward part. If the frame sits well back, a thinner insulation board can be returned into the reveal; if there is no room, the installation guide for the JUB system shows the reveal rendered only, with extra mesh, and notes that it remains a colder spot. Sills almost always need extending so they project clear of the new face. At the top, the roof overhang that used to shelter the wall may no longer cover the top of the insulation, so the eaves or verge detail has to be designed rather than patched with sealant.
Downpipes, gas flues, boiler outlets, meter boxes, satellite dishes and phone cables need checking against the thicker wall; some will need extending, relocating or new fixings. Some of that work belongs to other trades, and it has to be scheduled before the boards go on. At the bottom, the starter track position decides whether insulation stops at the DPC or continues below it, which needs a material suited to wet ground.
After installation
An insulated wall has a soft core behind a thin, hard skin. Hanging baskets, new cables or a replacement downpipe should go on fixings made for EWI, not ordinary plugs screwed into the render. Knocks from ladders or bins can dent the surface near the ground, so repairs should use the system's own basecoat, mesh and finish.
Keep the drawings and product names for the system that was installed. They tell the next person what is behind the render. The Energy Saving Trust treats external insulation as a change to the building fabric that needs assessing for each property, so any later alteration should be looked at in the same way.
Common questions
Does external insulation change how the house looks?
It can look much the same as a rendered house, but walls are thicker, reveals are deeper or shallower, and sills and the roof edge change. Brick-slip finishes exist where a brick look matters.
Can insulation go over the old render?
Sometimes, if the render is sound and well bonded. Hollow or loose render is removed first, because the boards are only as secure as the surface they are fixed to.
See housing and planning information for Middlesbrough and nearby places, including the source and geography behind each figure.