Rendering one elevation
Wall rendering in Middlesbrough
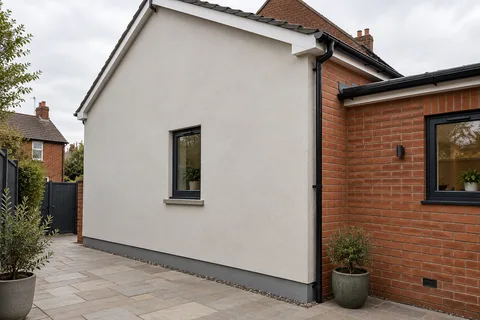
Wall rendering is the single-elevation version of the job: one gable, one rear wall, a new extension or a garden wall is rendered or re-rendered while everything else stays as it is. The work on the wall itself is the same as on a whole house. What makes it different is the boundary, because the new render has to stop somewhere neat and weather-tight.

On this page
Which walls get rendered on their own
The commonest case is a new extension in blockwork. The blocks are built to be rendered, and the house beside them may be brick, pebbledash or older render. The second is a single weather-facing gable or rear wall where the render has cracked or blown while the other walls are still sound when tap-tested. The third is a wall that was never meant to be seen, such as a side wall exposed when a neighbouring building came down.
A one-wall job is the wrong choice when tapping finds hollow areas on other elevations as well. You end up paying for scaffold twice and the old and new walls age differently. It is also worth pausing if the wall is bare brick in a conservation area: government guidance says cladding any part of a house in render there is not permitted development, so permission comes first.
- Set the edges Decide where new render stops against brick, stone or an existing finish.
- Prepare the background Remove loose material, repair masonry and prepare suction and surface key. Existing paint needs a specified removal or alternative treatment.
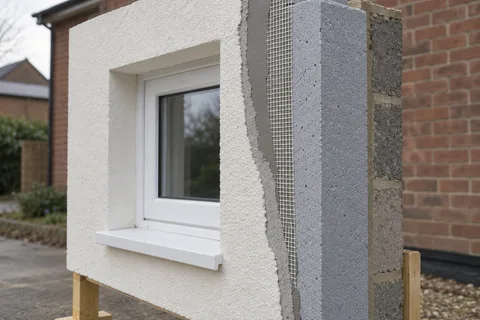
- Base coat Built up to level the wall, with mesh where backgrounds change or crack.
- Finish Matched to the rest of the house or chosen as a deliberate contrast.
- Shed the water Copings, sills and the base bead keep rain off the top and away from the bottom edge.
The usual order of work. The survey and the chosen products decide the actual steps.
New blockwork, old brick and dense concrete
The background decides the first coat. Lightweight and medium-density blocks soak up water quickly and suit renders designed for them; K Rend describes its K Mono monocouche as a one-pass finish over most moderate to low strength blockwork. Dense concrete blocks and hard engineering brick are the opposite problem: they offer little suction or key, so a spatterdash coat or a polymer base coat goes on first. K Rend's HP12 base coat, for instance, is aimed at dense backgrounds at a nominal 4–6mm, with reinforcing mesh where needed.
Older brick sits in between and varies brick by brick. The Mineral Products Association data sheet sets the principle that the undercoat should be weaker than the background but stronger than the finish. A render much stronger than soft brick tends to crack and pull at the surface of the brick as it shrinks.
What happens to the wall
For a re-render of an existing wall, the order is the same as for a house, with extra care where the new work stops.
Mark the extent on the wall itself, including returns, reveals and the strip beside the downpipe.
Cut the old render back to a clean, straight line with a disc where it meets render that is staying.
Hack off inside that line, brush down and repair any loose brick or open joints.
Fix beads: bell-cast above the DPC, stop beads at the boundary and at reveals, corner beads on the external angles.
Dampen the wall if the background is thirsty, then apply the scratch coat and key it.
Apply the finish once the undercoat has dried and shrunk, working the whole elevation in one go.
Seal the stop bead line where it meets the retained surface and refit fittings.
Where new meets old
There are three sensible places for a boundary: an external corner, a vertical movement joint, or a deliberate stop bead at a change of material such as an extension meeting the brick of the house. A stop in the middle of a flat wall is almost always visible and is a weak point where water gets behind the edge.
Where an extension joins the original house, the builder may have left a vertical movement joint. The render should not be carried across it as though it was one wall; it stops on a bead either side, or a movement bead is used, so the two buildings can move slightly without cracking the finish. New render beside old will not match exactly in colour or texture, even with the same product name, because the old surface has weathered. Decide whether you can live with that before work starts.
Garden and boundary walls
A freestanding wall is wet on both faces and along the top, so it is harder on render than a house wall. The top needs a proper coping that throws water clear on both sides; render taken over a flat top will crack and let water in. Check whether the wall has its own DPC and keep the render clear of the soil. If the wall is shared or belongs to a neighbour, agree access and ownership before anything is cut back.
After rendering, cement-based coats need protection from rain, frost and strong sun while they cure, and the undercoat must dry before the finish goes on. K Mono's data sheet, for example, rules out application below 5°C or with frost forecast within 24 hours, so a cold snap can hold the job.
Common questions
Will the new wall match the rest of the house?
It can be close in colour and texture, but rarely identical beside weathered render. Stopping at a corner or a change of material hides the difference better than a joint across a flat wall.
Should render go across the joint between an extension and the house?
No. If the builder has formed a movement joint, the render stops on beads at that line so the joint can still work.
See housing and planning information for Middlesbrough and nearby places, including the source and geography behind each figure.