Practical guide
Rainwater pipes and external wall insulation
Downpipes are one of the first things removed when external wall insulation (EWI) goes on, and one of the last things put back. In between, the wall gets thicker, so the pipe has to sit further out, its brackets need longer and different fixings, and the gutter above and the gully below may no longer line up. Getting those details right keeps rainwater away from the new render and the insulation behind it.

On this page
Why the pipe cannot simply go back
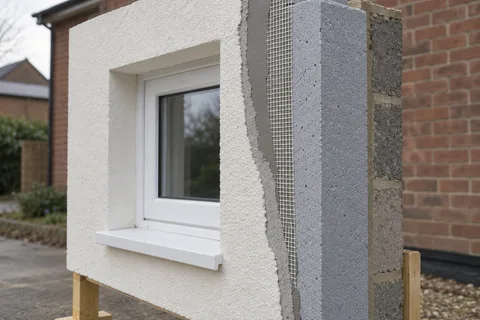
A downpipe is fixed to the wall with brackets screwed into the masonry. With EWI, the masonry is now behind a layer of insulation boards, a meshed basecoat and a finish. A bracket screwed through that render into the soft insulation has nothing solid to hold, and the hole lets water into the system. The pipe also has to stand off further from the wall, so its line from gutter outlet to ground changes.
That is why the Insulated Render and Cladding Association's general guide to installation starts with preparing the wall, and why manufacturers' guides list fittings removal and planned refitting as early steps. JUB's installation overview for its own system says to remove all fixtures and fittings and plan their refitting before boarding starts, including the use of purpose-made brackets where needed.

At the top: gutters and hoppers
The gutter is fixed to the fascia, which does not move when the wall gets thicker. If the existing roof overhang is short, the outlet may end up almost directly above the new wall face, leaving no room for the pipe to drop clear. Sometimes the answer is an offset section at the top of the pipe. Where the eaves barely project, the roof edge itself may need extending, which is roofing work and has to be designed before the boards go on.
Hoppers fixed to the wall have the same problem as brackets. They are taken off and refixed on supports suited to the insulation, and their joints need checking, because an overflowing hopper pours water straight down the new render.
Along the wall: brackets and fixings
Each bracket position needs a fixing that passes through the insulation into the masonry without crushing the boards or leaving a path for water. EWI suppliers sell fixings and stand-off brackets for exactly this, and JUB's guide refers installers to a bracket specialist where bespoke supports are needed. The positions are best marked before the finish goes on, so that the right fixing can be set into the system rather than drilled through it afterwards.
Around each fixing, the render is sealed so rain running down the pipe cannot get into the hole. Pipes also need a small gap from the finished face: a pipe pressed tight against the render holds a wet stripe behind it and stains.
At the bottom: shoes and gullies
A pipe that now stands further out may no longer drop into the gully or drain connection it used before. A short offset at the foot, or a new shoe, usually solves it. What should be avoided is a pipe that discharges onto paving against the wall, where water splashes back onto the base of the insulation.
The bottom edge of the system sits on a starter track above the DPC, as INCA describes, so the base of the pipe and the gully should be planned with that line in mind. Where insulation is carried below the DPC, it uses materials meant for wet ground, and the pipe detail at the foot needs the same thought.
Other fittings on the same wall
Downpipes rarely travel alone. The same wall often carries an outside light, a tap, a soil pipe, a boiler flue, a phone cable and perhaps a satellite dish. JUB's guide says flues and pipes should be extended by appropriately skilled engineers, and that phone lines needing to be moved are notified to Openreach. Each of those visits has to happen at the right point: after the old render is off and before the finish is applied, or the new surface ends up drilled and patched.
List every item on each wall before the work starts, with who will move it and who will put it back. A soil pipe or flue that cannot be moved easily may decide where the boards stop.
During the works
Between removal and refitting, rainwater still has to go somewhere. A temporary pipe or a length of flexible hose leading away from the wall stops the gutter dumping water onto bare masonry or freshly applied basecoat. On a scaffolded wall this is easy to forget, and one heavy shower can wash out a day's basecoat. If work stops for bad weather, the temporary pipe stays in place until the permanent one is back on its new brackets, and it should be checked after every storm.
Mark the old bracket and pipe positions on photographs before removal. They help the installer set out the new positions and show where old holes in the masonry need filling before the boards go on.
A worked example
Consider a hypothetical semi with a single downpipe on the side elevation, a short eaves overhang and a gully hard against the wall. Once 100mm-thick boards and their coats are added, the outlet sits only just outside the new wall face. The installer might fit an offset just below the gutter, use stand-off brackets fixed through the insulation into the brick, and fit an offset shoe at the base so the pipe still discharges into the gully. The board thickness here is an illustration, not a recommendation; the real figure comes from the system design.
Looking after it afterwards
Once the system is finished, keep the gutters and hoppers clear and check the pipe joints each autumn. A leak behind a pipe on an insulated wall can soak the system unseen, so stains or green streaks around brackets are worth acting on quickly. When a pipe is replaced in future, it should go back on fixings designed for EWI, not standard plugs into the render. Record the system name with the house papers, and mark on a sketch of each elevation where the brackets are fixed, so the next person knows what they are fixing into. If the survey points to a different kind of work, the Middlesbrough rendering homepage lists the alternatives.
See housing and planning information for Middlesbrough and nearby places, including the source and geography behind each figure.