Practical guide
Rendering at an extension movement joint
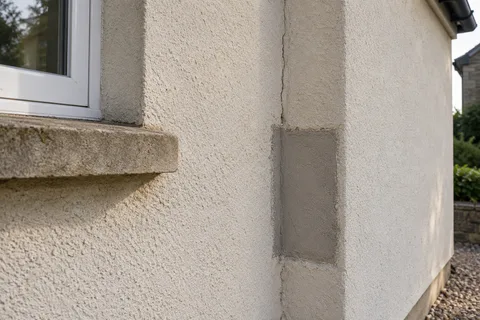
Where a new extension meets an existing house, there is usually a vertical line in the render: a joint, a bead or a change of finish. Owners often ask for it to disappear. It is there for a reason. The two structures stand on different foundations, are built from different materials at different times, and can move slightly in relation to each other. Render carried straight across that line tends to crack along it.

On this page
What a movement joint is
In masonry, a movement joint is a gap through the wall, usually filled with a compressible strip and sealed, that lets two parts of a building expand, contract or settle a little without cracking. Builders form one where an extension is not bonded into the original wall, and in long runs of blockwork. It is a structural decision made by the designer or builder, not a finishing choice.
Render is stiff. Laid across the gap, it acts like a bridge between two moving parts, and the first hairline crack usually appears exactly over the joint. Once it opens, rain runs in behind the render on both sides.

How the render detail is formed
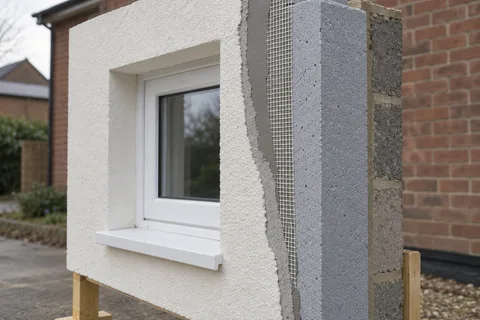
The render follows the joint, it does not hide it. The usual detail is a bead on each side of the line, or a purpose-made movement bead with a flexible centre. Renderplas's installation guide for its beads shows a gap of 8–14mm left between bell-cast beads at a movement joint, with a movement bead fixed over the top on render dabs, adhesive mortar or mechanical fixings and plumbed straight. Its guide also warns that, when through-coloured render is scraped back, the scraper must not touch the flexible membrane in the movement bead, or the joint will fail.
The joint then runs the full height of the wall, from the bell-cast bead above the DPC to the underside of the eaves or the extension roof. Any break in it, such as a strip of render bridging the line at a sill or a corner, gives the movement a place to crack instead.
Where mesh helps and where it does not
Glass-fibre mesh is bedded into basecoats to spread small stresses and limit cracking across a wall, and JUB's installation guide for its insulation system warns that leaving out the diagonal mesh patches at opening corners will lead to stress cracking. It does not stop two separate structures moving apart. A proposal to mesh across the junction and render over it is still a bridge, just a reinforced one, and the movement still has to go somewhere.
Mesh is useful elsewhere at the junction, though: where the extension wall changes from block to a different background, at the corners of new openings near the joint, and over any timber or steel lintel.
Making the line look deliberate
A movement joint does not have to look like an afterthought. Lining it up with a corner, a downpipe or the edge of a window makes it read as part of the design. Where the extension is set back even slightly from the house, the joint can sit in the internal corner, where it is barely noticed. A change of finish at the line, say smooth render on the extension against painted brick on the house, also makes the joint invisible because the eye reads it as the boundary between two materials.
If both parts are rendered in the same colour, expect the joint to show as a fine vertical line. That is the correct result.
Cracks at an existing junction
If a crack has already opened where an old extension meets the house, first find out whether a joint was ever formed. A straight vertical crack exactly on the junction, from ground to roof, usually means render was taken across an unbonded joint. A stepped or diagonal crack running away from the junction into the brickwork is a different matter and should be looked at by a surveyor before any render work, because it can indicate movement in the structure itself.
For the first case, the repair cuts out a strip of render along the junction, forms a proper joint with beads, and reinstates the render on both sides. Filling the crack with render or flexible filler and painting over it lasts until the next cold spell. The guide to render repairs explains how damaged render is cut out and rebuilt.
Matching an extension to the house
Appearance rules can affect the choice of finish before the joint is even drawn. Government guidance on householder permitted development says the external walls of an extension should be built of materials that give a similar visual appearance to the existing house. Rendering a new extension on a bare brick house may therefore take it outside permitted development, while a rendered extension on a rendered house is the natural match. In a conservation area, cladding any part of a house in render needs planning permission in any case. Check this at design stage, because it decides whether the junction is render to render or render to brick.
A worked example
Imagine a hypothetical two-storey side extension built against a 1930s brick house, with no bond between the old and new walls. The owner wants the whole house rendered in one colour. The renderer fixes a movement bead up the junction from DPC to eaves, stops the render on beads at the window reveals near the joint, beds mesh patches at the corners of the new openings, and renders both walls in the same finish. The completed elevation shows one fine vertical line. The house and the details are illustrative only.
Looking after the joint
Movement joints are maintenance items. The sealant or flexible strip in them can harden and split over time, so check the line every year or two and have it renewed if it has split or come away from the edges. When the house is redecorated, the joint should not be painted over with a rigid coating or filled with render to tidy it up.
Keep a note of where the joints are on each elevation. A future builder fixing a pipe or a light near the junction needs to know not to bridge it, and a future renderer needs to know to keep it. For other kinds of rendering work, see the Middlesbrough rendering homepage.
See housing and planning information for Middlesbrough and nearby places, including the source and geography behind each figure.